Staging Tips to Wow Prospective Residents
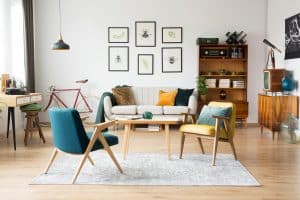
Contrary to the popular belief that staging is done only by people looking to sell a home, rental units need the same TLC.
Prospective renters are people looking for a home, not just a vacant apartment. When done right, staging can help prospects focus their attention on the unit’s best qualities and not so much on the drawbacks. For rentals, this means creating a model unit by adding art, furniture, plants and other items to showcase how the apartment could look like once residents move in.
So, in case you’re still on the fence about staging apartments at your multifamily community, here are some advantages:
- It gives the model unit a homier look and helps prospects envision themselves living in it.
- It helps you better market your listings and attract renters faster.
- It shows that you’re a true professional who cares about keeping your apartment community in a superior condition.
- It makes your listing stand out from the competition.
A marketing trend that has been gaining popularity since the onset of the pandemic is self-guided touring—prospects schedule access to the property’s units without an agent and view the apartments at their own pace, without concerns related to social distancing. This makes for another good reason to ensure you’re making all preparations to welcome prospective renters.
TIPS FOR RENTAL STAGING
- Know your rental audience. Depending on the type and location of your asset, you should know who is more drawn to your location. Some communities might be more family-oriented, while others might be targeting young professionals. Once you identify the type of renter you’re looking to attract, stage the unit in the most alluring way to cater to their lifestyle.
- Use furniture and accessories if the unit is unfurnished. However, if you don’t have a design professional to work with, make sure you’re using items with neutral designs and colors that will fit in other units as well. As for accessories, you may choose elements that reflect your geographical location. For example, if your community is located on the coast, you can integrate nautical elements like seagrass, seashells and coral rocks. Flowers and plants will soften any room they’re placed in, so they are always a good choice.
- Think of the unit’s most attractive features. This can be the kitchen, the living room, large walk-in closets or even the view from the window. Once you determine these areas, build your staging around them.
- Avoid clutter. Not only does this take up too much space, making the room feel smaller than it actually is, but it also gives a tensed vibe to prospects looking at the listing’s photos. Furthermore, be sure to place only items that help potential renters visualize the space as their own. This means avoiding personal touches, such as personal photos on the walls or shelves, as well as overly religious items.
Make sure that the unit is clean and in tip-top shape. Nicks, scratches and holes in the walls, broken doors and light fixtures should be foxed before the actual staging phase.
HOW TO STAGE APARTMENTS LIKE A PRO
Staging calls for equal parts creativity and technical skills. Since the end result is a photo/video gallery or a virtual/pre-recorded tour, here are some key aspects you need to master for a successful staging project:
- Lighting is everything. Poor lighting will turn even the nicest rental unit into a bland space. Take photos during daytime and make sure there’s plenty of daylight coming in. Open all the windows and blinds, even turn on all the lights in the room, and make sure where you position yourself to avoid that annoying contre jour effect.
- Aim for crisp, clean images with vertical lines at straight 90 degrees. Experts recommend that you shoot from waist level instead of eye level; this way, the photo will make the viewer feel like they are looking into a room instead of looking down into a room. Lower angles can be used, especially with wide-angle lenses, to make objects look bigger. In addition, when taking photos of a room with a mirror on the wall (such as the bathroom) make sure you’re positioning yourself at the right angle so that your reflection doesn’t show in the actual photo.
- Number of photos. Photos are the best tools to invite a prospective tenant to your property. Don’t be stingy and post just two or three images, but don’t overdo it either. Research shows that listings with 11 to 15 photos get 70 percent more clicks than those with no photos. And before you upload all the art, do a final review and remove all repetitive images and videos.
- Remember to keep the images realistic, so use a light hand when adjusting sharpness, contrast and white balance. Go for a clean and honest look.
- If your marketing budget is too tight to include a professional camera, you can use your smartphone. These days, most mobile phones come equipped with good cameras, so chances are you’ll be satisfied with the results. Alternatively, you can use a tripod and an affordable point-and-shoot digital camera to take high-quality photos that will do justice to your listed apartments.
Source: multihousingnews.com







 Accessibility