How to Caulk a Bathtub or Shower
Prevent mold growth and water damage in the bathroom by caulking a bathtub or shower.
When water gets behind a bathtub, it creates a warm, damp environment ideal for mold and mildew growth. Soon, you might find that the bathroom has a musty odor that you can’t get rid of no matter how much you clean. When water gets into these narrow cracks, it can also cause damage to the wood, drywall, and insulation.
Fully removing the mold and mildew or repairing any damages is difficult because the problem is located behind the tiled wall or under the tub. So, it’s best to replace old caulk when you see signs of wear, like discoloration or cracking. Use this guide to learn how to caulk a bathtub or shower.
Selecting Suitable Bathroom Caulk
Don’t grab the first type of caulk that you see on hardware store shelves. Not every caulk is suitable for the amount of moisture in a shower or tub. Look for products that are labeled for bathroom use to find a caulk that is mold resistant, waterproof, and designed for sealing shower and tub gaps.
Generally, bathroom caulk falls into two different types, including silicone and latex. Silicone is a better option for protecting against moisture, though latex caulk is easier to work with. Many DIYers opt for latex to ensure that the gaps are properly filled and the finished product looks good. You can also find caulk products that combine silicone and latex to create a siliconized latex caulk for a strong seal and easy workability.
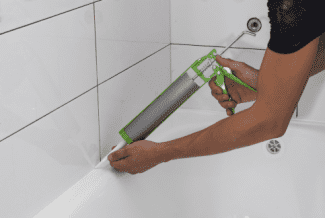
How to Caulk a Bathtub or Shower
Caulking a bathtub or shower is a relatively straightforward task that can be handled by most DIYers. It’s recommended to wear old clothing and nitrile gloves while you work because caulking can be messy. Additionally, it’s important to properly ventilate the room by setting up fans and opening the door or window to allow any odors to dissipate instead of collecting inside the bathroom.
What You Need
- Cloth
- Bucket
- Warm soapy water
- Utility knife
- Putty knife
- Drop cloth
- Painters tape
- Bathroom caulk
- Caulking gun
Step 1: Remove Old Caulk and Prep Area
It’s possible to caulk over old caulk if the old caulk is in relatively good condition without any cracks. However, it’s recommended to remove the old caulk entirely before applying the new caulk to get the best results.
Before you start, put down a drop cloth to keep the bathroom clean. Use a utility knife or an oscillating caulk removal tool to cut the lines of old caulk away from the tile. Take your time during this process to ensure that you don’t damage the tiles. Use a putty knife to scrape away any layers of caulking that stubbornly stick to the tub, shower, or tiles.
Once the old caulk has been removed, use an old cloth and warm soapy water to clean any residual residue, then wait for the area to dry completely. Apply painters tape on either side of the gap where you will apply the caulk. If you’re working on a new bathtub or shower stall that doesn’t have preexisting caulk, you only need to worry about cleaning and taping the area for the next step.
Step 2: Load Caulking Gun
Some DIYers use a tube of caulk without a caulking gun. While it’s possible to force the caulk out of the tube without the proper tool, it’s much easier and more accurate to invest in a caulking gun. Use a utility knife to cut off the tip of the caulking tube. Remember not to cut off too much or you’ll have to deal with a thick, sloppy bead.
There will usually be an indentation point marked on the tube. Cut the tip just above the indentation point, then load the tube into the caulking gun and gently squeeze the trigger to test the size and flow of the caulking bead. If the bead is too narrow, try cutting a bit more off of the tip of the tube for a broader bead.
Step 3: Caulk Gaps and Tool the Bead
Line up the caulking gun with the first gap you’ll be working on. Squeeze the trigger to begin applying caulk. Pull the gun away from the starting point in a smooth motion to apply a neat bead of caulk in the gap. If you choose to push the caulking gun forward instead of pulling it away, make sure you’re holding the caulking gun at a 90-degree angle for the best results.
Once the gap is full, you can either wet your finger or use a damp, lint-free rag to tool the bead. Tooling refers to smoothing the excess caulk by wiping along the bead of caulk. After tooling the bead, peel off the painters tape while the caulk is still wet. Repeat this process for each section that needs to be caulked.
Step 4: Wait for Caulk to Dry
After applying the caulk, it can take several hours for it to dry to the touch and at least 24 hours before it is cured. Ensure the room is well-ventilated, then leave the caulk to dry. Check the manufacturer’s directions to determine the amount of time the caulk will require before it is fully cured. Do not use the bath or shower until the caulk is fully cured to prevent mold, mildew, and water damage.
How to Fill Large Gaps in a Shower or Tub
Caulking is designed for filling gaps that are a maximum of a quarter-inch in width to a half-inch in depth. If any of the gaps surrounding the tub or inside of the shower exceed this width or depth, then caulk alone will not be able to seal the gap. It might be tempting to try to keep forcing caulking into the gap, but when it sets, the caulk will not have any support to keep it in place.
Instead, invest in backing material, which can be inserted into the gap to provide the caulk with a simple structure to support it. After putting the backing material in place, you can apply the caulk to the gap. The backing material will keep the caulk in place, allowing you to create the watertight bond that is necessary to protect against water damage.
Source: Better Homes & Gardens


 Accessibility