6 tips for preventing frozen pipes
Key takeaways
- In freezing temperatures, insulate pipes that go through unheated areas
- Install frost-proof faucets and electric heat cables where needed
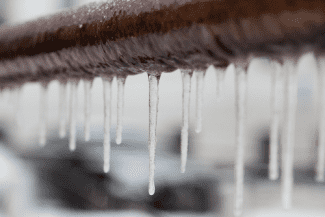
When winter temperatures drop below 20ºF, water pipes are at serious risk of freezing, bursting, and springing a leak. This can cause extensive water damage to your home, not to mention a costly clean-up project.
To appreciate the risk, picture this: Under full water pressure, a pipe leak as small as ⅛-inch wide can release 10 gallons of water per hour. Water leaks are not only messy and disruptive, the resulting moisture can also cause mold to grow and spread if not properly remediated.
The most vulnerable pipes in your home are located in unheated areas, such as:
- Basements
- Crawl spaces
- Attics
- Garages
- Exterior walls
Outdoor hose faucets and sprinklers are also very prone to freezing temperatures.
If a pipe has already burst, you’ll need to hire a professional plumber ASAP. But it’s possible to avoid or reduce the risk of ruptured pipes altogether with some advance prevention. These six low-cost, DIY fixes can protect your home from a deep-freeze repair:
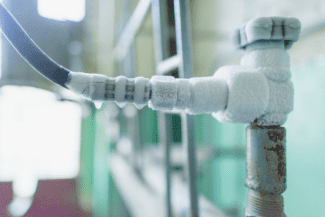
1. Insulate water pipes
The common way to prevent pipes from freezing? Insulate them. It’s like bundling up your pipes to keep them warm. Insulation not only prevents water pipes from freezing, it also helps minimize heat loss from hot-water pipes.
There are three main types of pipe insulation:
Foam pipe insulation
The most commonly used type, foam insulation comes in a long, cylindrical foam rubber or polyethylene tube that’s split along its 6-foot length (the most commonly used size). To install foam insulation, simply cut it to the length of the pipe with a sharp knife, spread apart the split seam, and slip the insulation jacket onto the pipe like a sleeve.
A self-sealing type of foam insulation has adhesive along the seam to help keep it closed around the pipe. Just peel-away the protective plastic strips to expose the adhesive, then squeeze the insulation along its length to seal the seam.
To fully insulate pipes that turn a 90º corner, cut the ends of the tube at a 45º angle and push the corner pieces tightly together.
Rubber pipe insulation
This type of pipe insulation is made out of rubber, which is more flexible, durable, and energy-efficient than foam. Expect to pay $5–7 per 6-foot length for rubber pipe insulation.
Fiberglass pipe insulation
 These thick, densely woven fiberglass tubes or wrap are covered by a fiber-reinforced paper and aluminum foil. Fiberglass insulation is typically used to protect steam-heat or hot-water pipes that get hot enough to degrade rubber insulation.
Fiberglass pipe insulation tubes come in 3-foot lengths that cost between $3 and $9 each, depending on pipe diameter. The tubular style works well when pipes have minimal turns. Use a sharp, serrated knife to cut it to length and install it just like foam insulation.
Fiberglass pipe wrap, typically 3 inches wide, is sold in 25-foot rolls for about $6 per roll. It’s wrapped around pipes and affixed with insulation tape or duct tape. This type of insulation is ideal for pipes that turn lots of corners.
2. Install a frost-proof faucet
Outdoor faucets, also known as hose bibs, sillcocks, or hydrants, are particularly susceptible to freezing. You can protect them by installing a rigid-foam cover that slips over the faucet like a glove. The downside of these covers is that you have to remember to do this whenever the weather turns frigid (if you remove them between cold spells).
A better option: Replace the existing faucet with a frost-proof sillcock. This hose bib looks similar to a standard faucet, except that it has an extra-long stem that shuts off the water inside the house, where it isn’t exposed to freezing.
3. Block crawl space vents
Another way that some homeowners protect pipes under the house during particularly cold weather: Temporarily block off vents to the crawl space. These air vents can allow in very cold air that freezes pipes and sends a chill through the house.
Blocking crawl-space vents is a bit controversial. That’s because the vents allow air circulation that prevents mold and mildew. Temporarily blocking them during extremely cold weather generally doesn’t increase mold risk. Don’t forget to unblock them after a few days.
You can use rigid polystyrene foam to block the open vents. Cut the foam at least 4 inches larger than the vent and secure it with wire or double-sided tape.
4. Install heating cable or tape
During extreme cold spells, when insulation alone can’t prevent water pipes from freezing, electric heat cables or heating tapes can handle that job. Some heat cables and tapes wrap around the pipe; others run alongside pipes and are secured with fiberglass or aluminum adhesive tape or plastic cable ties.
Just plug the cable or heat tape into an electrical outlet. The electrical current running through the cable will warm the pipe just enough to keep water flowing.
Paying Too Much For Insurance?
Get a FREE quote to insure your rental properties for less.
5. Use a space heater
In smaller, compact spaces, such as a laundry room, small bath, or utility closet, a strategically placed electric space heater can generate just enough warm air to keep pipes from freezing. This will not work in a garage, basement, or other large area.
Caution: Do not use an electric space heater near standing water—electricity and water don’t mix and could cause electrocution.
If pipes freeze, do NOT thaw them with an open flame, such as a blowtorch or propane torch. The risk of starting a fire is too great and the heat is too intense (it could boil the water in the pipes, causing them to burst).
6. Turn off the water
If your house will be entirely vacant for an extended period during winter, consider winterizing your home by shutting off the water system and draining the pipes.
To do this:
- Turn off the water supply’s main shut-off valve.
- Open all the faucets.
- Flush the toilets to drain the system of trapped water.
Just remember that the water will be completely shut off, so make sure it won’t be needed for other purposes.
Also, consider leaving the heat on low, even if you won’t be occupying the house. Lowering the thermostat to 55ºF will help keep pipes from freezing without wasting significant energy.
How to find a good plumber
If you have a burst pipe, you don’t have the luxury of picking the perfect plumber for repair. You’ll want the one who can show up first.
Ideally, when choosing plumbing services, it’s important to hire a seasoned pro. Here’s how to find a good licensed plumber:
- Verify that the plumber is licensed, bonded, and insured.
- Check their reviews on Yelp and their rating with the Better Business Bureau (BBB).
- Be wary of someone who gives quotes over the phone before diagnosing the problem.
- The plumber should provide an on-site estimate.
- Double-check the quote to make sure it includes parts and labor.
What it costs
Plumbing prices can vary based on the complexity of the problem, your location, the plumber’s level of expertise, and when the service is needed. Average rates run between $45 and $200 per hour.
Expect to pay a premium for plumbing visits after-hours (nights and weekends) and during a cold snap. Some plumbers charge a minimum rate for house calls, particularly if the job is an emergency. In these situations, an onsite visit can cost $300.
Source: Yelp


 Accessibility